Hot Runner Maintenance – A Better & Safer Way!
Hot runner maintenance can be a challenge. You look for dead shorts caused by pinched wires, open circuits, and you would want to measure the resistance of the heaters to ensure they are in a healthy range.
Let’s start by measuring the resistance of the heaters. Put your meter in ohms, make sure the test leads are good, and then go to each one of the heater circuits (you have to know the wiring diagram), touching each pin for each circuit.
Measuring resistance will not tell you if you have a direct short. The only way to do that is to put one lead on the body of the hot half and then touch each of the pins with the other lead to ensure no continuity. Tip: You may see a reading on one of the zones, but pay close attention to the acronyms on your meter. If there is an M, it’s displaying mega ohms. If that is the case, it is only reading the mineral inside the heater.
Now, let’s measure the resistance of the thermocouples (t/c) to verify we do not have an open. Again, knowing the wiring diagram, you would put the leads into the corresponding circuits to ensure you have a contact. Note most hot runner systems use grounded thermocouples, so we won’t look for shorts (they are a short by definition).
So, why would you want to measure the resistance of the heaters? You’re looking for resistance values 20% more than the norm or higher. This is an indication of corrosion and fatigue which means the heater will likely fail soon. You would want to change out that heater now while it’s not in production.
Are most molders really checking for shorts before plugging their hot half into a controller?
We explained how you would go about checking for shorts in the hot half above, but what happens if you skip this step or it doesn’t get done right? The answer is that you will find out violently when you turn on the hot runner controller. Here are some possible outcomes:
- In a perfect world, it would blow the fuse on the controller power module.
- If it gets passed the fuse, it could damage the controller.
- The grounded thermocouples in the hot half could have easily become a circuit, thereby damaging the thermocouple, blowing the thermocouple module fuse, and potentially damaging the module and other controller wiring.
- If the tool is hung in a press, the platens and frame will act as a conduit to ground, but if someone is touching the press, they have also become a path to ground.
The time to check for direct shorts is before you hang the mold in a press!
The bottom line is that the old way of performing these routine hot runner maintenance requirements is time-consuming, prone to error, and just not being done.
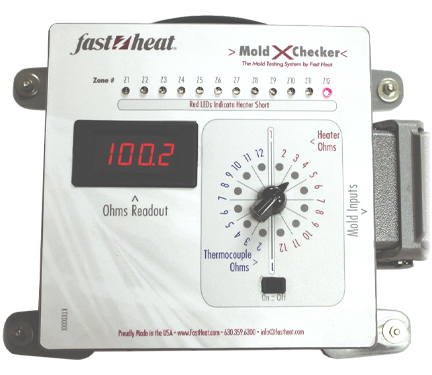
Hot Runner Maintenance Using the MoldXChecker®
Just like you would connect your hot half to a hot runner controller, you can now just connect to the Fast Heat Mold Checker. If you’re wise and use the Mold Checker in the tool room, you would also know if you had an open heater. Waiting until you have a mold on the press to find out you have an open heater means you wasted all of the time. To troubleshoot an open alarm on your controller on the shop floor, you’d have to backtrack through your connectors and cables and then climb up on the tool (dangerous!) to check your mold box wiring and heater for that zone. If you truly have an open heater, you’ll need to pull the tool. And, it is really easy to make a mistake when working top of a platen with tiny connection pins.
A best practice would also be to have a Mold Checker at the machine so you can double-check for dead shorts before turning on your controller! Use the separately wired circuit in the Mold Checker with the dial in the vertical position. If there is a short, you’ll see that zone # light up.
Reference:
Hot Runner Maintenance Guide
MoldMaking Technology Magazine PTXPO 2023 Preveiw
Plastics Technology Magazine – Turn Up the Heat on Your Hot Runner Maintenance Program